Midjourney Website Tutorial: Beginners Guide
The Midjourney website has quickly become a favorite among beginners (and advanced users) for creating stunning visual content.
Whether you’re exploring art for fun or using it for a professional project, this Midjourney website tutorial will break down everything you need to know to use the Midjourney website effectively and help simplify the process.
Unlike using Discord, it’s designed to simplify your creative process, helping you generate impactful images with just a few clicks.
🔑Key Takeaways
- Unlike Discord, Midjourney website simplifies ai image generation and you can start creating images quickly.
- You do not have to download any software (unlike Discord) to use.
- All the tools needed are in a clean and simple layout right at your fingertips.
- Easily navigate to create an image, explore prompts and images from other users, or edit images or chat with other users.
What is the Midjourney Website?
Originally, Midjourney was only accessible by using Discord, it’s now a fully-fledged web-based application.
Unlike Discord (which you have to download), the Midjourney website simplifies the process of bringing ideas to life using AI technology and is packed with tools that simplify the process of creating stunning visuals.
This Midjourney website tutorial will help you learn more about how to use the website so you can get up and running quickly.
How to Get Started with Midjourney
Starting your journey with Midjourney is simpler than you might think. Using the Midjourney website is designed with beginners in mind.
Let’s dive into the steps to get you started.
How to Signup for Midjourney
Even though it may seem like a lot of steps, don’t worry, this Midjourney tutorial helps guide you through, ensuring you feel confident navigating the platform.
To access the Midjourney website, you’ll need an account. Here’s how you can set it up:
Visit the Midjourney Website
Head over to the Midjourney website and click on the “Sign Up” or “Get Started” button.Choose a Subscription Plan
Midjourney offers various subscription tiers, so you can pick one that fits your needs and budget. Options range from basic plans for hobbyists to premium options for professionals.Create Your Account
Fill in your email and password. You’ll need to verify your email to complete registration.Payment Setup
Once you have chosen your plan, you’ll be prompted to input your payment details. Rest assured, this is secure and straightforward.Log In and Explore
Once your account is set up, and you have paid for a subscription, log in, and you’ll be ready to start creating.
Navigating the Interface
Once logged in, the sleek and intuitive interface of Midjourney greets you.
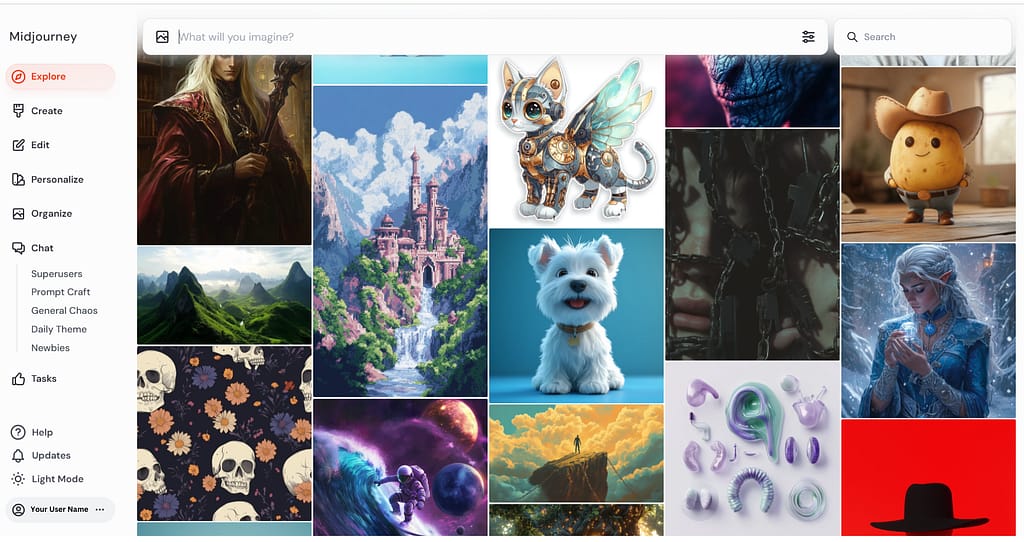
Take some time to explore these tabs. They’re designed to guide you through the creative process effortlessly.
The Image Bar
What will you image. This is where you write your prompt. The simpler and more precise your prompt, the better your results.
Adjust Prompt Settings
Located on the right side of the “what will you image” bar, is where you can adjust the setting for the images you will be creating. You can set the aspect ratio, version, style, chaos, and much more. Check out my guide of Midjourney prompting tips for how to adjust your prompt settings.Search
You can search the images you created or images that other people have created in the Explore tab.Explore
See the images of what others are creating. You can take a look at their prompts also. Please do not “steal” their prompts but use them for inspiration for creating your own images.Create
This is where all the images you have generated can be seen. You can click on any one of them to view, download, edit, rerun, or change the image.Edit
This is Midjourney’s built-in editor. Any image (yours or an upload one), can be resized, retextured, describe an image your editing, and much more.Personalize
You can teach Midjourney what you like. There are two ways to do this: Standard Way: selecting between a pair of images or Create a Mood Board. This is very helpful when creating your own images as you can use your –p (personalization parameter) to generate images that match your taste.Organize
Use the organize tab to create folders, show your different profiles (personalize), use filters to find images by rating (liked, liked, and hidden), type (grids and upscales), image size (square, landscape, and portrait), version (1, 2, 3, 4, 5, and 6), and other (tiled and raw).Chat
Want to collaborate with other users? Check out the chat rooms. There are several different rooms to choose from: Superusers, Prompt Craft, General Chaos, Newbies, Daily Theme, and Help.Tasks
Afraid you may run out of fast hours? Complete different tasks to get free fast hours. You can either rank images or take surveys. You can also rate ideas (but will not earn any fast hours) for what you would like to see in future updates to Midjourney.Help
The help tab is for finding resources, documentation, billing support, or report an issue.Notifications
When announcements (new features, etc.) about Midjourney are made, this is the area where you can read about them.Light/Dark Mode
You can change the look of the Midjourney website app background by using the light mode, dark mode, or use what your system is set to.User Information
Here is where you can manage your profile, subscription, uploads, go into Midjourney on Discord, or log out.
Using Basic Commands
The heart of creating with Midjourney starts in its Imagine Bar.
Here’s how to get started:
Locate the Imagine Bar
Enter a text description of the image you want – this is called a “prompt.”Write Your Prompt
Be as detailed or as broad as you’d like. For example, type “dreamy sunset over the ocean, pastel colors” to tell the Midjourney bot what you would like the image to look like.Generate and Tweak
After entering your prompt, watch as Midjourney generates 4 different variations. You can pick the one you like, request (rerun) new variations with a single click, or edit the image.
Getting the hang of these basic tools and parameters will make it easy for you to bring your creative ideas to life.
If your not achieving the images you envision, exploring resources such as these Midjourney Prompts to help you.
Customizing Your Creations
Midjourney offers several fun ways to make your creations stand out.
Adjusting Image Settings
One of the best features of Midjourney is how much control you have over your images. Want to make your visuals pop on Instagram or tailor them to fit a specific project?
Simple tweaks can make all the difference.
- Aspect Ratio: Adjusting aspect ratios defines the shape of your image. Use the –ar parameter followed by dimensions like 16:9 for widescreen or 1:1 for a square look at the end of your prompt. Example –ar 16:9.
- Stylization: If you want your image to look closer to hand-drawn art, lower the stylization setting. You can set the range (0 – 1000) to get subtle enhancements to bold, artistic transformations. Just add the — s (stylize) to the end of your prompt.
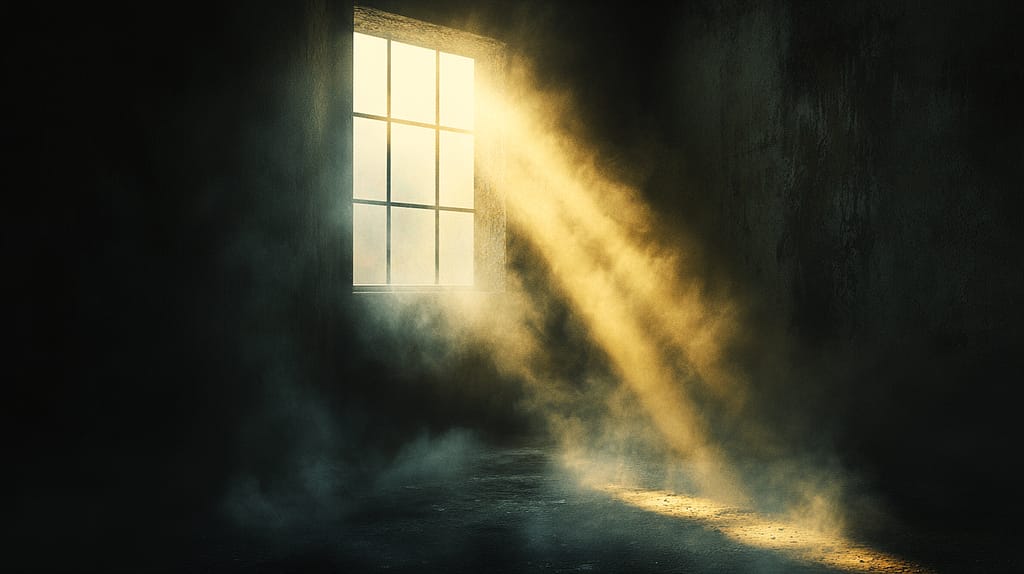
- Lighting: Some projects demand extra sharpness, while others need a soft focus. Tweak lighting to strike the right balance. Here are a few examples of lighting you could use: natural light, backlight, butterfly lighting, sunlight, spotlight, rays of shimmering light, Godrays, starlight, or fluorescent.
Midjourney prompt example: hyper-realistic image of a dark room, a single beam of warm sunlight streaming through a window in the wall, illuminating the center of the room, dust particles float in the light –ar 16:9 –stylize 250
Exploring Variations and Remixes
Did the image generated “almost” capture your vision? You can use Midjourney to remix your images, edit them, or create variations to keep your creativity rolling.
After generating an image, go into Create or Organize Tab and click on the image.
On the right side of the image you will see these options:
- Vary: You can make slight changes (subtle) or broader changes (strong).
- Upscale: You can keep the image close to the original (subtle) or make it more creative (creative).
- Remix: You can add small differences (subtle) or large differences (strong) to the image.
- More: Chose between Rerun an image or open the built in editor.
- Use: Pick between using the image with another prompt (Image), use the same style (Style), or add the prompt to the Imagine Bar and add (or remove) elements in the prompt.
These tools make refinement effortless and saves you time.
By mastering settings, prompts, parameters, and the editor, you can transform basic ideas into extraordinary art!
Tips for Downloading and Organizing
Keeping your work organized is half the battle when creating multiple designs. On the Midjourney website, several features make this effortless:
Download Options
Once you’ve created an image, go into the Create or Organize tab, click on the image you like, and click on the download icon.Folders for Organization
Once you have started creating images, create folders to keep your images organized and easier to find. If your library grows large, this will have you time when searching for a specific image.Like an Image
By “liking” an image, this can also help you quickly find images that you may want to use later, for either to download or use in another prompt.
By mastering Midjourney’s organizational tools, you can focus more on what you love—creating remarkable art—and less on logistics.
If you’re looking for prompts or ideas to expand your creative scope, hop over to AI and Design Inspiration for resources to ignite your imagination.
Tips for Beginners on Midjourney
Starting with any new platform can be frustrating, especially one as creative and innovative as the Midjourney website.
But don’t worry, this section covers frequent beginner mistakes and how you can get around the learning curve.
Common Mistakes to Avoid
Using Midjourney for the first time often comes with a learning curve. To help you get the most out of the platform, here’s a breakdown of the common pitfalls to steer clear of:
Overloading Prompts
One frequent error beginners make is writing long and/or complicated prompts. AI works best when given clear and concise instructions. Instead of writing, “A fantastic futuristic city with a sunset, flying cars, detailed skyscrapers, and a vibrant bustling crowd reflected in the lower water surface,” try simplifying it to something like, “Futuristic cityscape with flying cars under a sunset.” Less is often more.Ignoring Aspect Ratios
Many users forget to specify the aspect ratio, leading to results that may not fit their needs. Use the –ar command to set your preferred dimensions. Using the correct aspect ratio may help cut down on the time you need to edit the image. Check out these Midjourney aspect ratio FAQs for more information on how using the correct aspect ratio can save you time.Not using other Versions
Another common mistake is not exploring the other version available in Midjourney. The –v (version) parameter allows you to use any version (1, 2, 3, 4, 5, 5.1, 5.2, 6, 6.1, Niji 4, Niji 5 or Niji 6). Don’t settle for the first outcome—experiment and then experiment some more. Side Note: some parameters may not work in some of the versions.
Mistakes are part of the learning process, but by avoiding these frequent issues, you’ll save time and frustration.
To Wrap this all Up
The Midjourney website opens the door to a simple yet powerful way to explore AI image generation.
I hope that this Midjourney website tutorial gave you insight and helped you learn more about this amazing software.
With its tools, customization options, and a clean simple layout, it’s easy to start crafting visuals tailored to your vision.

One Comment